Servers
The OpenStack Compute service (Nova) is the primary engine for deploying and managing virtual machines within an OpenStack cloud environment. It provides a robust API that allows users to launch, manage, and scale instances, while interacting with underlying resources like storage, networking, and hypervisors. Nova works alongside other OpenStack services to ensure seamless orchestration of compute resources, supporting both simple and complex cloud workloads. In Nova, a server refers to a virtual machine (VM) instance, a physical machine, or a container.
Encryption at rest
By default all data stored in a VM (on ephemeral and on volume storage) receives encryption at rest. The system encrypts data before writing it to a physical device. When a storage device gets lost or damaged, encryption protects your data against unauthorized access.
Local storage
In case of a local storage VM flavors, data stored on the VM's ephemeral local storage is not encrypted. In this case only data stored on attached Ceph volume is encrypted at rest.
List Servers
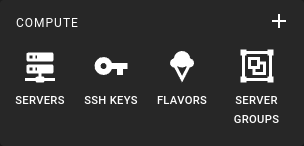 To obtain a list of all servers in a specified region, click on the Servers icon in the sidebar.
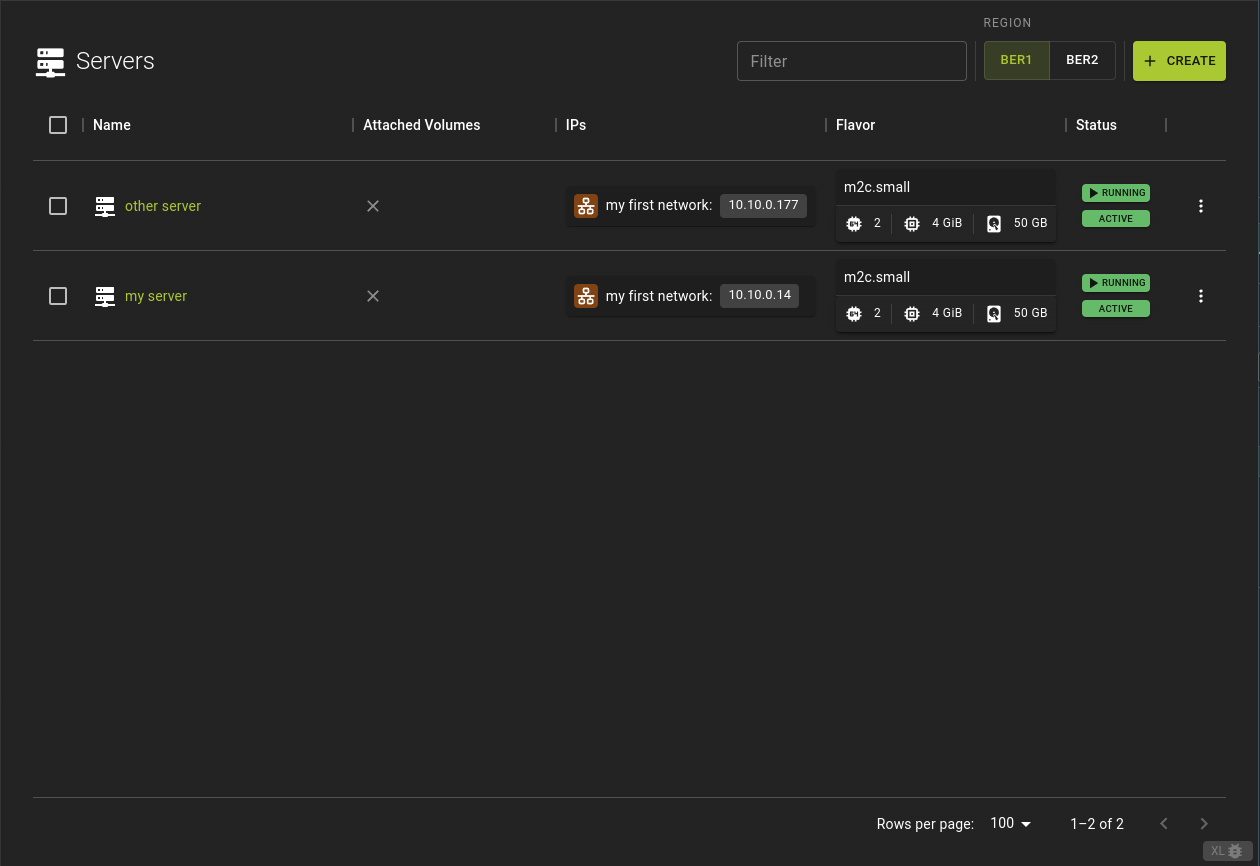
To change the region, please use the region selector located above the list. DUS2HAM1.
You can sort and filter the list to find the servers you want.
Selecting the name or ID of a server will direct you to the server details page.
Additionally, a range of actions can be initiated for a server by selecting the option located at the end of a table row. This will display a menu listing the most commonly used actions for a server.
Usage
openstack server list
Output
+--------------------------------------+--------------+--------+-------------------------------------------+-------------------------+----------+
| ID                                   | Name         | Status | Networks                                  | Image                   | Flavor   |
+--------------------------------------+--------------+--------+-------------------------------------------+-------------------------+----------+
| 9cdf2a81-0271-4b6f-aa3e-61asdas51dsa | lampserver   | ACTIVE | lampserver-net=10.0.0.14, 185.56.132.xxx  | Ubuntu Server 22.04 LTS | m1c.tiny |
+--------------------------------------+--------------+--------+-------------------------------------------+-------------------------+----------+
| 18e28c13-999e-4389-92ce-asd1das1das5 | lampserver   | ACTIVE | lampserver-net=10.0.0.11, 195.192.128.xxx | Ubuntu Server 22.04 LTS | m1c.tiny |
+--------------------------------------+--------------+--------+-------------------------------------------+-------------------------+----------+
Creating a Server
Creating servers in OpenStack involves launching virtual instances from predefined images, selecting flavors to determine compute resources, and configuring storage and networking settings for optimal performance and connectivity.
Prerequisites
To create a server, you need to choose a network. If you don't have a suitable network, the UI can take you to the network creation workflow if necessary. - It is advisable to deploy an SSH key on the server. If you do not yet have an SSH key, create one now
To create a new server navigate to the server list and click the Create button in the title bar.
Basic Configuration
Provide a name and description for your server and select the flavor to be used.
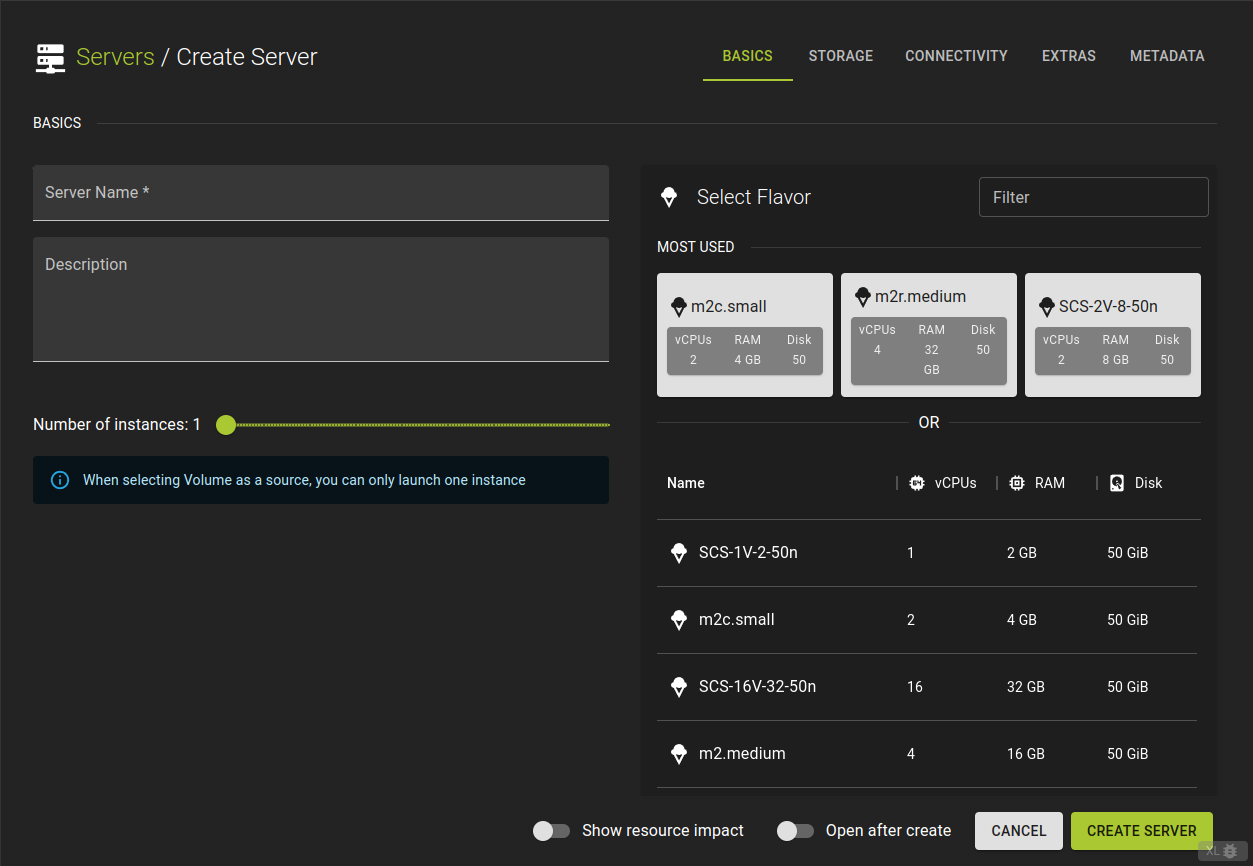
Server Name-
Give your server a friendly name
Description- Use this optional field to provide a description of the resource or to make any necessary notes.
Number of instances- Allows you to control how many instances of a server are created at once, using the same settings.
Select Flavor- Choose a flavour to set your server's specs.
Storage Configuration
This section lets you pick the image your virtual server will boot from and set up the server's storage. You can choose from images, snapshots, existing volumes or server snapshots.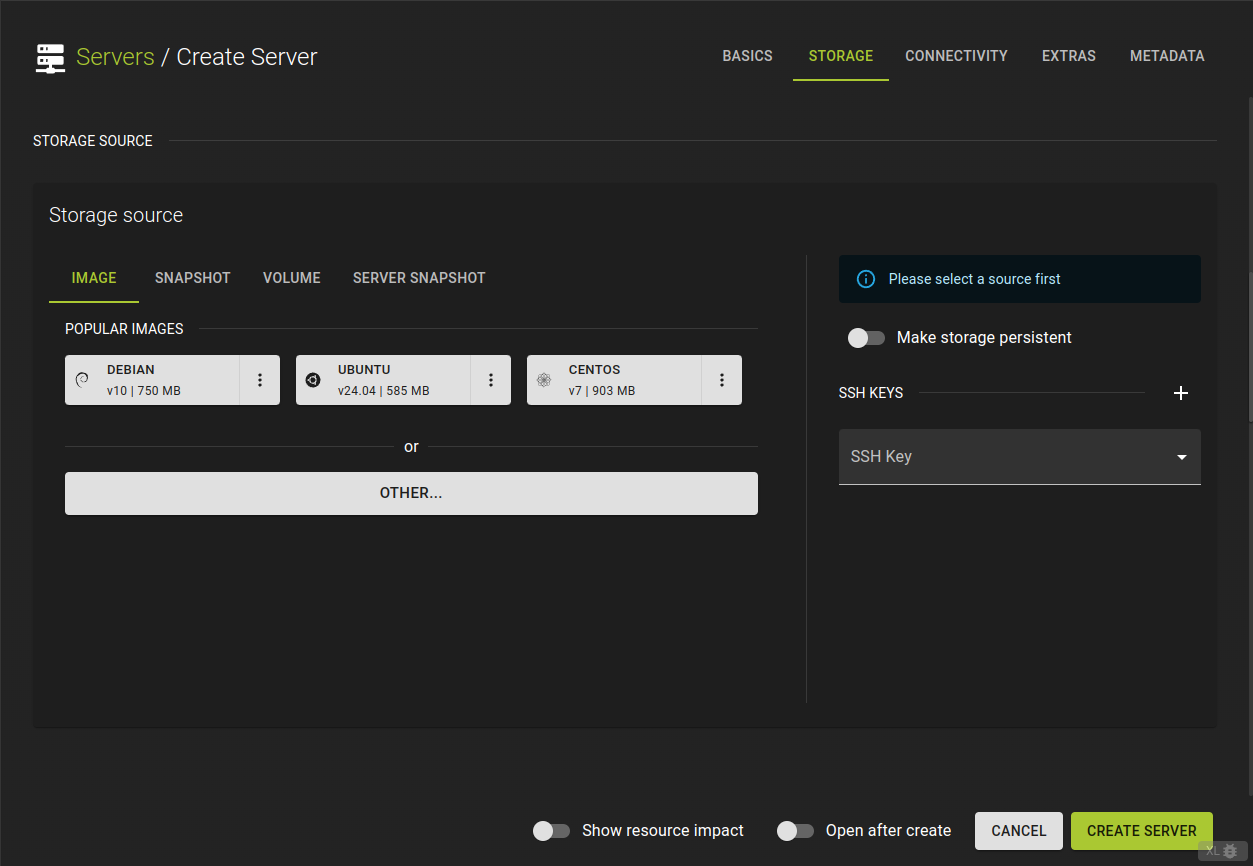
- booting straight from the source
- or creating a volume from the selected source.
You can also select the volume type
If you want to deploy an ssh key on the server you can select it here
Network Configuration
Select the networks you want your server to be connected to. You can choose multiple networks. The server will have one network interface for each selected network.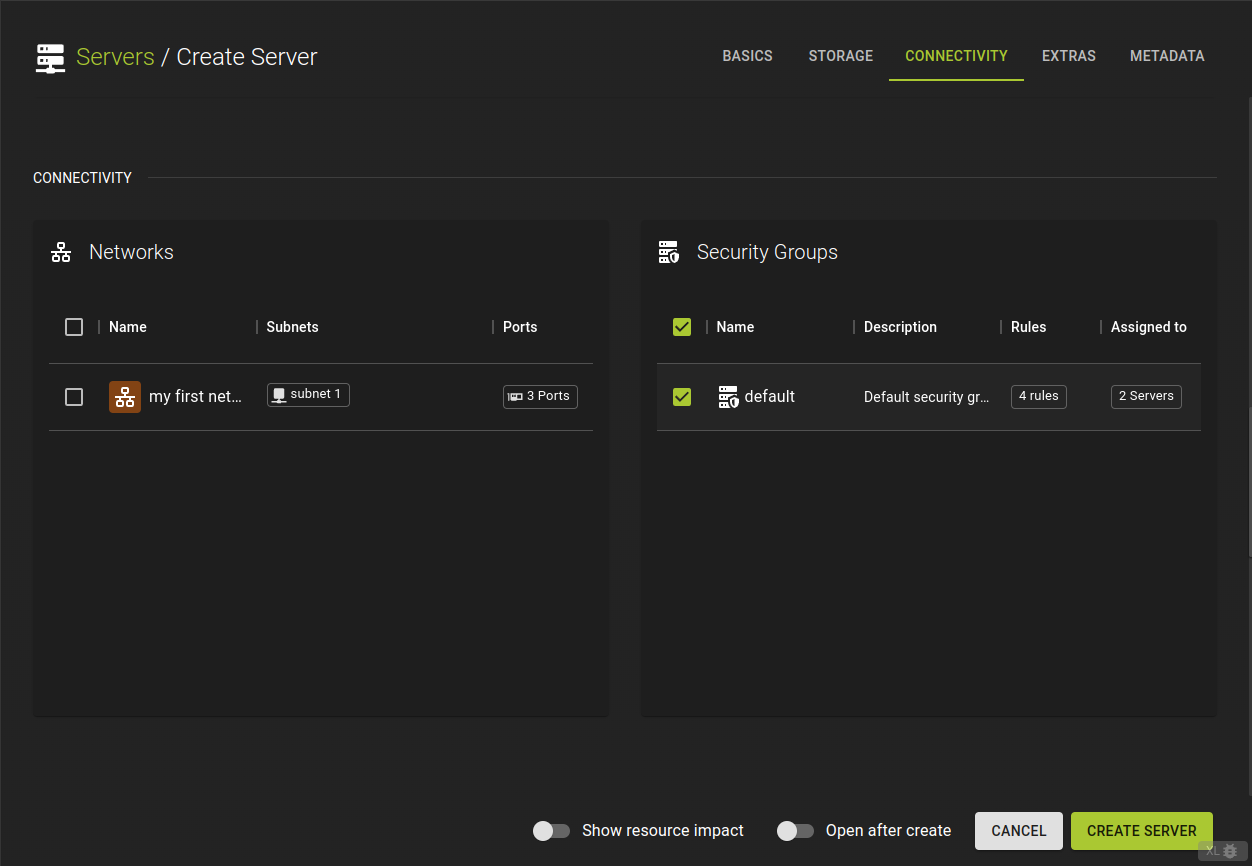
Learn more about creating security groups
Extras and Meta Data
This section allows for further optional configuration of your server.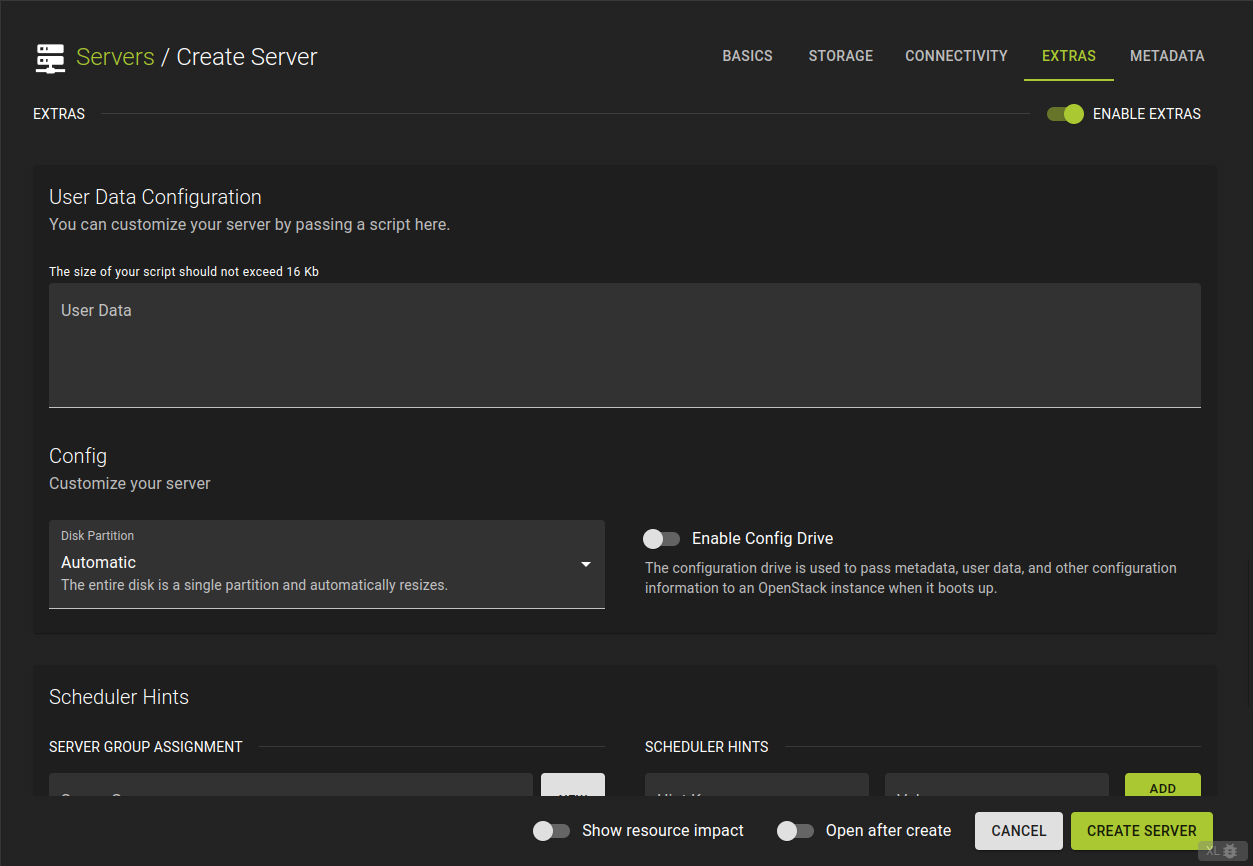
User Data- allows you to pass extra configuration details to a server when it’s launched. For example, you can add SSH keys or run initialization scripts to set up the server automatically during boot.
Disk Partition- allows you to control how the available storage space is organized and used by dividing it into separate sections.
Scheduler hints- Scheduler hints in OpenStack help guide the Nova scheduler to place servers based on specific criteria, like affinity (same host) or anti-affinity (different hosts), optimizing resource allocation during instance creation.
Finalize
Once you have finished setting up the sections above, click create server The configuration will be checked. Should your configuration be incomplete or not satisfiable you will be presented with appropriate error messages.Otherwise, the server will be created and ready to use soon.
You can choose to go to the detail page or the list of servers. Using the "Open after create" toggle button. Your server is ready when it reaches available state
Basic Creation
openstack server create  --key-name simpleInstanceSSHKey
    --image "Ubuntu Jammy 22.04 (2024-02-29)"
    --flavor m2c.tiny
    --nic net-id=<NetworkIdFromExistingNetwork>
    simpleInstance
--key-name- Name of the SSH Key to be deployed on the server
--image- Identifier of image to be used as source
--flavor- Name of the flavor to be used for the server
--nic net-id- Identifier of a network that the server should be connected to. Please note that the network has to already exist and have at least one subnet configured.
Example
openstack server create --image "Ubuntu Jammy 22.04" --flavor m2c.tiny --nic net-id=83f6ab1c-a5c8-46dd-be2f-6ab0c5792954 simpleServer
Output
+-------------------------------------+------------------------------------------------------------------------------------------------------------------------------------------------------------+
| Field | Value |
+-------------------------------------+------------------------------------------------------------------------------------------------------------------------------------------------------------+
| OS-DCF:diskConfig | MANUAL |
| OS-EXT-AZ:availability_zone | None |
| OS-EXT-SRV-ATTR:host | None |
| OS-EXT-SRV-ATTR:hostname | simpleserver |
| OS-EXT-SRV-ATTR:hypervisor_hostname | None |
| OS-EXT-SRV-ATTR:instance_name | None |
| OS-EXT-SRV-ATTR:kernel_id | None |
| OS-EXT-SRV-ATTR:launch_index | None |
| OS-EXT-SRV-ATTR:ramdisk_id | None |
| OS-EXT-SRV-ATTR:reservation_id | None |
| OS-EXT-SRV-ATTR:root_device_name | None |
| OS-EXT-SRV-ATTR:user_data | None |
| OS-EXT-STS:power_state | N/A |
| OS-EXT-STS:task_state | scheduling |
| OS-EXT-STS:vm_state | building |
| OS-SRV-USG:launched_at | None |
| OS-SRV-USG:terminated_at | None |
| accessIPv4 | None |
| accessIPv6 | None |
| addresses | N/A |
| adminPass | et9rh6XXHe5R |
| config_drive | None |
| created | 2024-09-24T13:00:12Z |
| description | None |
| flavor | description=, disk='50', ephemeral='0', extra_specs.aggregate_instance_extra_specs:ceph='true', id='m2c.tiny', is_disabled=, is_public='True', location=, |
| | name='m2c.tiny', original_name='m2c.tiny', ram='2048', rxtx_factor=, swap='0', vcpus='1' |
| hostId | None |
| host_status | None |
| id | 3504a48e-f780-4aa1-a289-29e147e14c93 |
| image | Ubuntu Jammy 22.04 (a2f8706f-e885-40ce-b389-82130226d98e) |
| key_name | None |
| locked | None |
| locked_reason | None |
| name | simpleServer |
| pinned_availability_zone | None |
| progress | None |
| project_id | 7680106489c047efa65334c7b0b11fc6 |
| properties | None |
| security_groups | name='default' |
| server_groups | None |
| status | BUILD |
| tags | |
| trusted_image_certificates | None |
| updated | 2024-09-24T13:00:13Z |
| user_id | a066865e7eff46aaaf46c4a936a4fdde |
| volumes_attached | |
+-------------------------------------+------------------------------------------------------------------------------------------------------------------------------------------------------------+
Adding a floating IP
You can associate a floating IP you have previously reserved using the command below.
openstack server add floating ip <InstanceId from above> <floatingIpFromAbove>
<InstanceId>- Identifier of the server
<FloatingIP>- IP-address you want to assign
Example
openstack server add floating ip 3504a48e-f780-4aa1-a289-29e147e14c93 109.68.225.193
Output
openstack server list

+--------------------------------------+---------------------------+--------+-----------------------------------------------------------+--------------------------+----------+
| ID                                   | Name                      | Status | Networks                                                  | Image                    | Flavor   |
+--------------------------------------+---------------------------+--------+-----------------------------------------------------------+--------------------------+----------+
| 3504a48e-f780-4aa1-a289-29e147e14c93 | simpleServer              | ACTIVE | delme=10.0.0.229, 109.68.225.193                          | Ubuntu Jammy 22.04       | m2c.tiny |
+--------------------------------------+---------------------------+--------+-----------------------------------------------------------+--------------------------+----------+
Assigning additional security groups
openstack server add security group <InstanceId> <SecurityGroup>
<InstanceId>- Identifier of the server
<SecurityGroup>- ID if the security group you want to assign
Example
openstack security group list
+--------------------------------------+---------------------+---------------------------------------------------------+----------------------------------+------+
| ID | Name | Description | Project | Tags |
+--------------------------------------+---------------------+---------------------------------------------------------+----------------------------------+------+
| 4a902c4b-13a4-4d31-862f-0b1e2da44e15 | default | Default security group | 7680106489c047efa65334c7b0b11fc6 | [] |
| 9d7dbe0a-bf20-41e1-a3fd-599f4c1662ee | example-sec-group | Contains security rules for the Kubernetes worker nodes | 7680106489c047efa65334c7b0b11fc6 | [] |
+--------------------------------------+---------------------+---------------------------------------------------------+----------------------------------+------+
openstack server add security group 3504a48e-f780-4aa1-a289-29e147e14c93 example-sec-group
+-------------------------------------+------------------------------------------------------------------------------------------------------------------------------------------------------------+
| Field | Value |
+-------------------------------------+------------------------------------------------------------------------------------------------------------------------------------------------------------+
| OS-DCF:diskConfig | MANUAL |
| OS-EXT-AZ:availability_zone | dus2 |
| OS-EXT-SRV-ATTR:host | None |
| OS-EXT-SRV-ATTR:hostname | simpleserver |
| OS-EXT-SRV-ATTR:hypervisor_hostname | None |
| OS-EXT-SRV-ATTR:instance_name | None |
| OS-EXT-SRV-ATTR:kernel_id | None |
| OS-EXT-SRV-ATTR:launch_index | None |
| OS-EXT-SRV-ATTR:ramdisk_id | None |
| OS-EXT-SRV-ATTR:reservation_id | None |
| OS-EXT-SRV-ATTR:root_device_name | None |
| OS-EXT-SRV-ATTR:user_data | None |
| OS-EXT-STS:power_state | Running |
| OS-EXT-STS:task_state | None |
| OS-EXT-STS:vm_state | active |
| OS-SRV-USG:launched_at | 2024-09-24T13:02:51.000000 |
| OS-SRV-USG:terminated_at | None |
| accessIPv4 | |
| accessIPv6 | |
| addresses | delme=10.0.0.229, 109.68.225.193 |
| config_drive | |
| created | 2024-09-24T13:00:12Z |
| description | None |
| flavor | description=, disk='50', ephemeral='0', extra_specs.aggregate_instance_extra_specs:ceph='true', id='m2c.tiny', is_disabled=, is_public='True', location=, |
| | name='m2c.tiny', original_name='m2c.tiny', ram='2048', rxtx_factor=, swap='0', vcpus='1' |
| hostId | 56d3ca49daef5dc539bc79c70ccbe055d190a34426d6325b3bd34f52 |
| host_status | None |
| id | 3504a48e-f780-4aa1-a289-29e147e14c93 |
| image | Ubuntu Jammy 22.04 (a2f8706f-e885-40ce-b389-82130226d98e) |
| key_name | None |
| locked | False |
| locked_reason | None |
| name | simpleServer |
| pinned_availability_zone | None |
| progress | 0 |
| project_id | 7680106489c047efa65334c7b0b11fc6 |
| properties | |
| security_groups | name='default' |
| | name='example-sec-group' |
| server_groups | None |
| status | ACTIVE |
| tags | |
| trusted_image_certificates | None |
| updated | 2024-09-24T13:02:51Z |
| user_id | a066865e7eff46aaaf46c4a936a4fdde |
| volumes_attached | |
+-------------------------------------+------------------------------------------------------------------------------------------------------------------------------------------------------------+
Boot using UEFI
To boot using UEFI, you need to use an image that has been prepared for the purpose. See the section about images for more information.
Example
# Terraform Provider configuration

terraform {
  required_providers {
    openstack = {
      source  = "terraform-provider-openstack/openstack"
    }
  }
}

# Select latest OpenStack Ubuntu 24.04 Image

data "openstack_images_image_v2" "image" {
  most_recent = true

  visibility = "public"
  properties = {
    os_distro  = "ubuntu"
    os_version = "24.04"
  }
}

# Upload SSH key (please change this to your local public key file)

resource "openstack_compute_keypair_v2" "ssh_key" {
  name       = "ssh-public-key"
  public_key = file("~/.ssh/id_rsa.pub")
}

# Network configuration

data "openstack_networking_network_v2" "ext_net" {
  name = "ext-net"
}

resource "openstack_networking_network_v2" "network" {
  name           = "net"
  admin_state_up = "true"
}

resource "openstack_networking_subnet_v2" "network" {
  name            = "subnet"
  network_id      = openstack_networking_network_v2.network.id
  cidr            = "10.20.30.0/24"
  ip_version      = 4
  enable_dhcp     = "true"
  dns_nameservers = ["1.1.1.1", "8.8.8.8"]
}

resource "openstack_networking_port_v2" "os_server_port" {
  name               = "os_server_port"
  admin_state_up     = "true"
  network_id         = openstack_networking_network_v2.network.id
  security_group_ids = [openstack_networking_secgroup_v2.ssh_access_secgroup.id,
  ]

  fixed_ip {
    subnet_id = openstack_networking_subnet_v2.network.id
  }
}

resource "openstack_networking_router_v2" "network" {
  name                = "router"
  admin_state_up      = "true"
  external_network_id = data.openstack_networking_network_v2.ext_net.id
}

resource "openstack_networking_router_interface_v2" "network" {
  depends_on = [openstack_networking_secgroup_v2.ssh_access_secgroup]
  router_id  = openstack_networking_router_v2.network.id
  subnet_id  = openstack_networking_subnet_v2.network.id
}

# Security Group for SSH access

resource "openstack_networking_secgroup_v2" "ssh_access_secgroup" {
  name        = "ssh_access_secgroup"
  description = "Security group for ssh access"
}

resource "openstack_networking_secgroup_rule_v2" "ssh_rule" {
  direction         = "ingress"
  ethertype         = "IPv4"
  protocol          = "tcp"
  port_range_min    = 22
  port_range_max    = 22
  remote_ip_prefix  = "0.0.0.0/0"
  security_group_id = openstack_networking_secgroup_v2.ssh_access_secgroup.id
}

# Create an OpenStack VM
resource "openstack_compute_instance_v2" "os_server" {
  name        = "server"
  image_name  = data.openstack_images_image_v2.image.name
  flavor_name = "m1.small"
  key_pair    = openstack_compute_keypair_v2.ssh_key.name

  network {
    uuid = openstack_networking_network_v2.network.id
    port = openstack_networking_port_v2.os_server_port.id
  }

  lifecycle {
    create_before_destroy = true
    ignore_changes        = [flavor_name, image_name]
  }
}

# Create a floating IP / public IP
resource "openstack_networking_floatingip_v2" "floatip_1" {
  pool = "ext-net"
}

# Associate the floating IP
resource "openstack_networking_floatingip_associate_v2" "floatip_1" {
  floating_ip = openstack_networking_floatingip_v2.floatip_1.address
  port_id = openstack_networking_port_v2.os_server_port.id
}
View and Modify a Server
Click a server in the list or follow a link to see details.
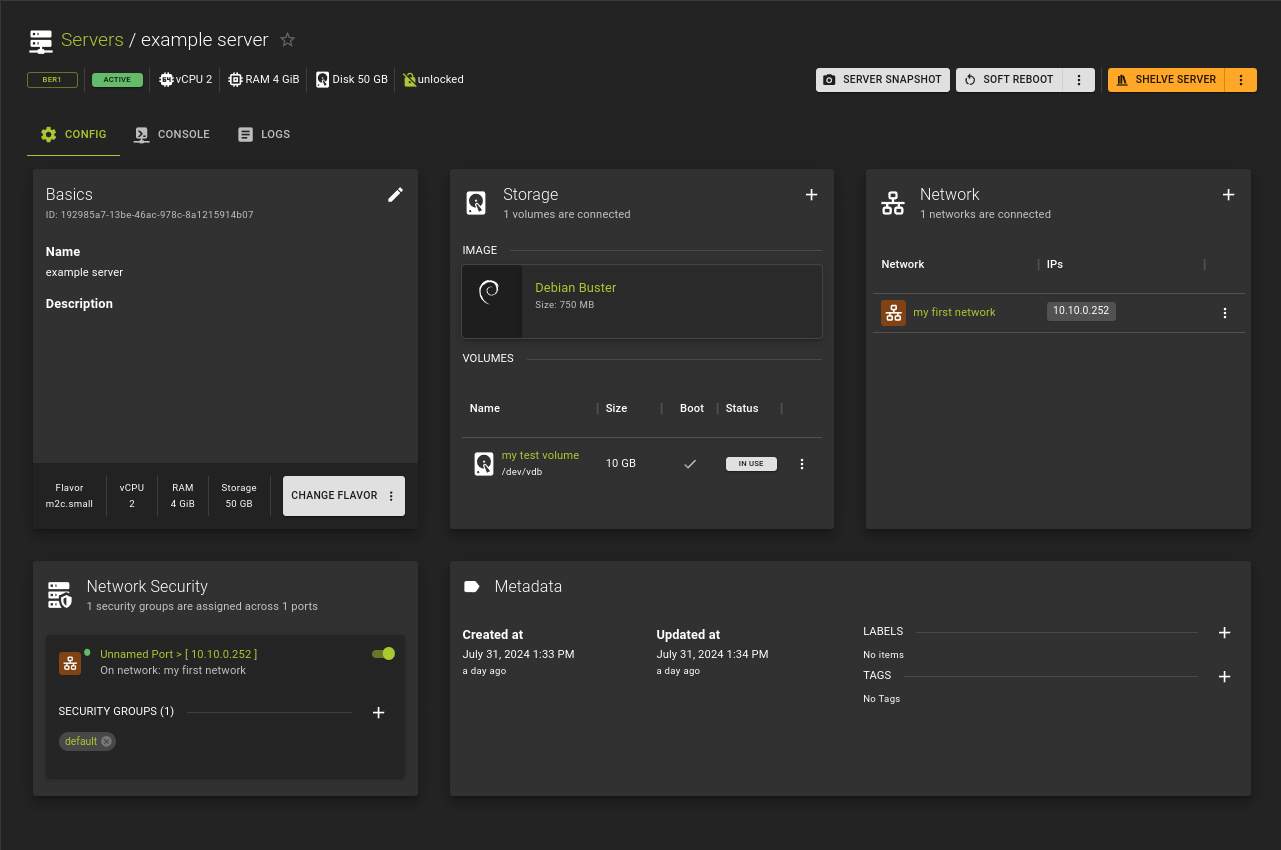
The details page is structured with tabs for easy navigation.
Config
The information regarding the server is presented in cards that group related settings.
Console
Gives access to a remote console session
Logs
Access your servers logs here.
Config
The Config tab is the default tab and composed of cards that group similar settings
Basics Card
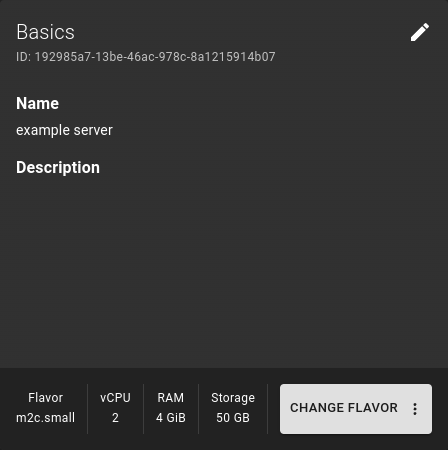 Allows editing immediate properties of the server, such as name and description
Storage Card
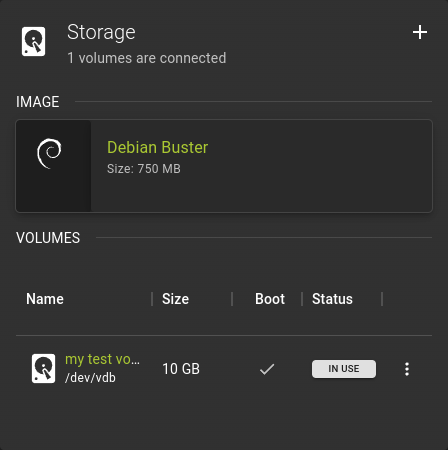 This card shows your server's storage settings.
Use it to manage volumes and create snapshots.
Click on a volume to view details.
This card shows your server's storage settings.
Use it to manage volumes and create snapshots.
Click on a volume to view details.
Network Card
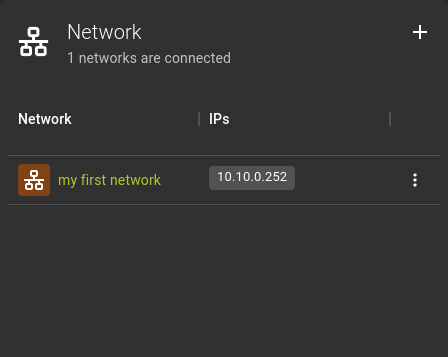 This shows the network connections for your server. Use it to manage connections and IP addresses.
Network Security Card
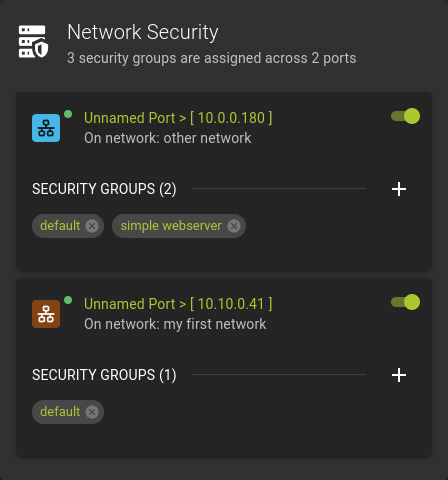 This card manages the security groups for your servers' network connections.
Metadata Card
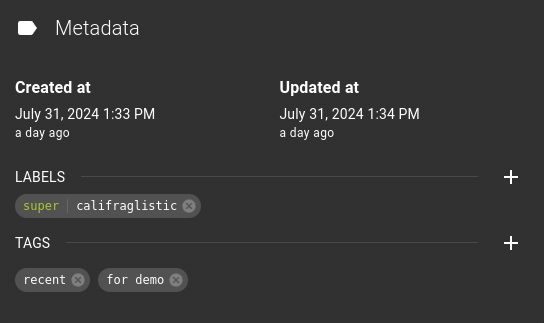 Add and remove labels and tags here.
Console
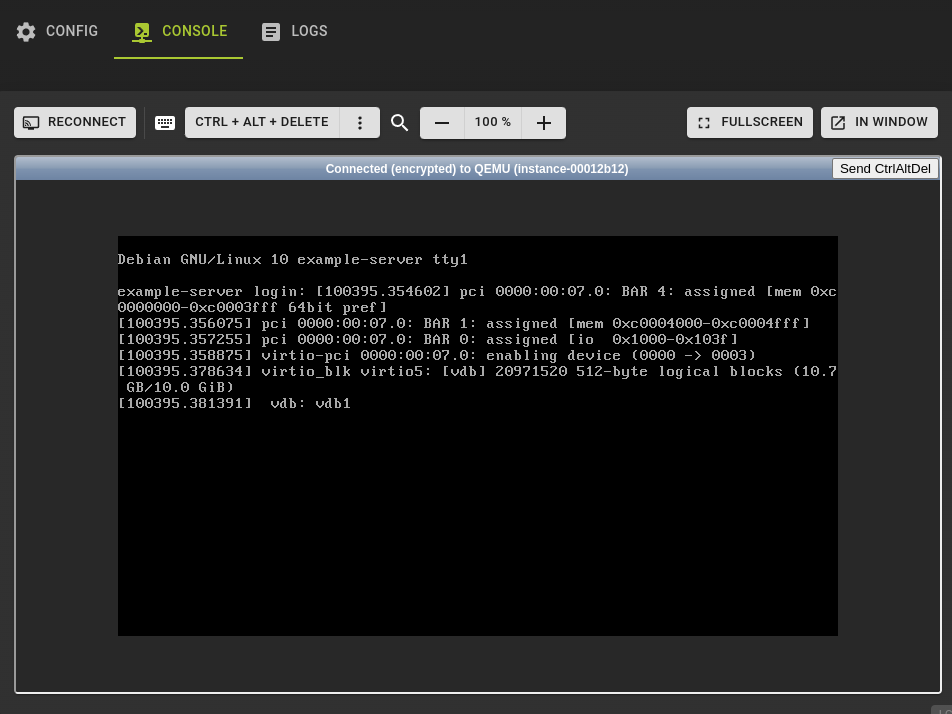 The Console tab allows access to your server via VNC.
You can also access your server's window managers and graphical user interfaces remotely.
Logs
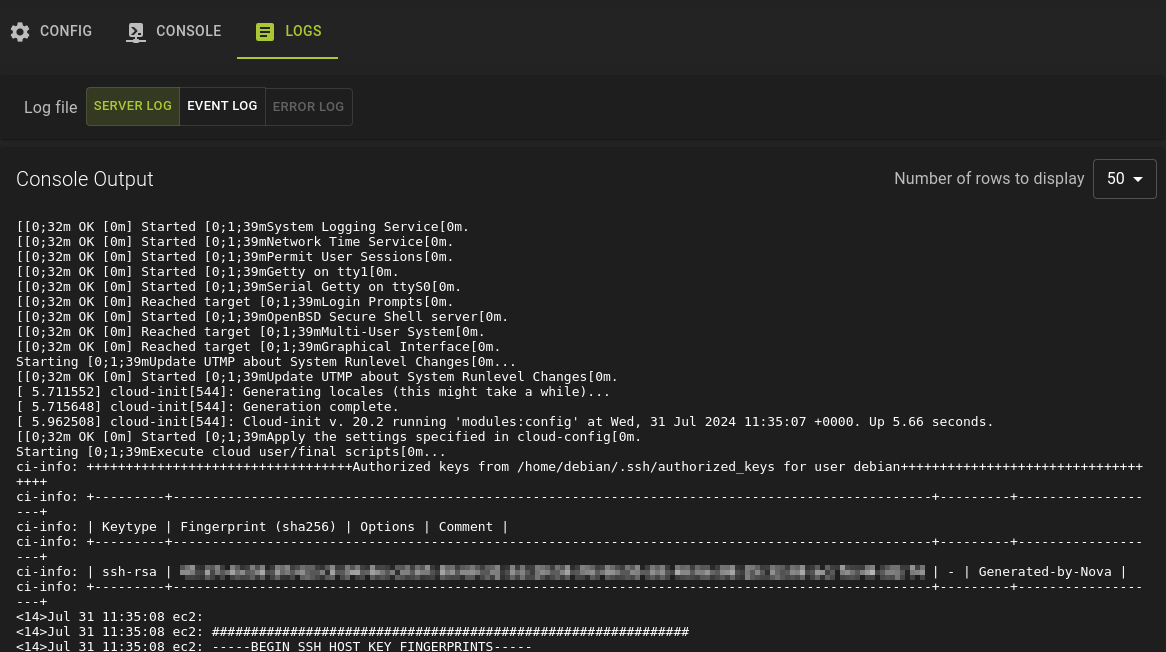 The Logs tab gives you access to the logs of your server.
Server Log
This is your servers output to stdout.Event Log
A log of the provisioning events regarding the server.Usage
openstack server show <SERVER_NAME or SERVER_ID>
<server>- Identifier of the server you want to show
Example
openstack server show <SERVER_NAME or SERVER_ID>
Output
Change Basic settings
Basic modifications are atomic changes, such as renaming a server
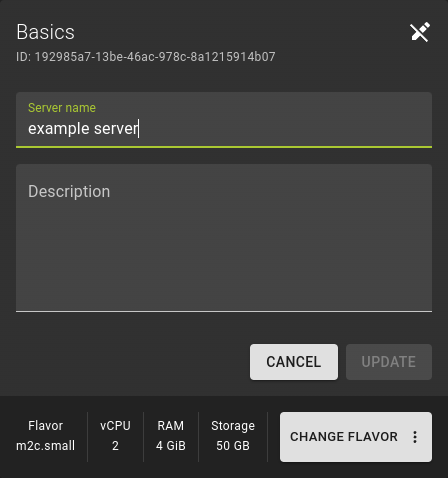
In the Basics card on the servers detail page:
- Click on the icon to enter edit mode.
- Rename and describe your server as needed
- Click Update to apply the changes
Here you can also change the flavor of your server.
Usage
openstack server set <server>
<server>- Identifier of the server you want to update
Adding / Removing Volumes
Adding an existing Volume
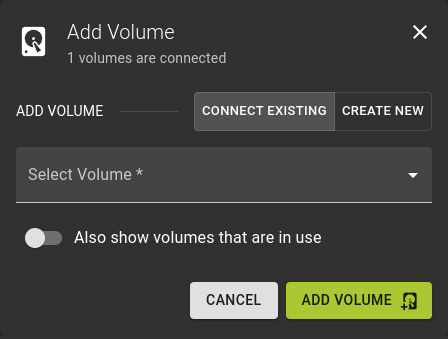
In the Storage card on the servers detail page:
- Click on the icon
- Select Connect Existing
- Select a volume from the list of volumes
- Click Add Volume
Creating and attaching a new Volume
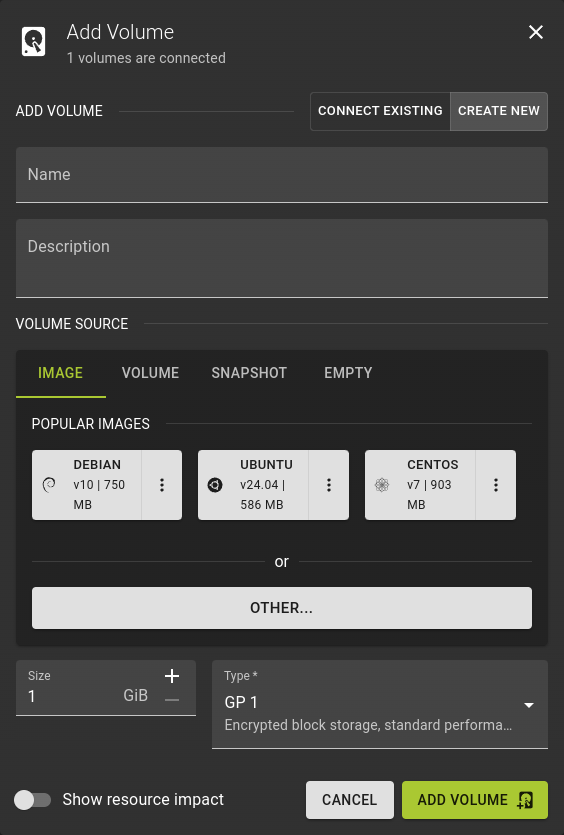
In the Storage card on the servers detail page:
- Click on the icon
- Select Create new
- Provide a name and description for the volume
- Select the source for the volume or leave it empty
- Select the size for the volume
- Select the volume type
- Click Add Volume
Detaching a Volume
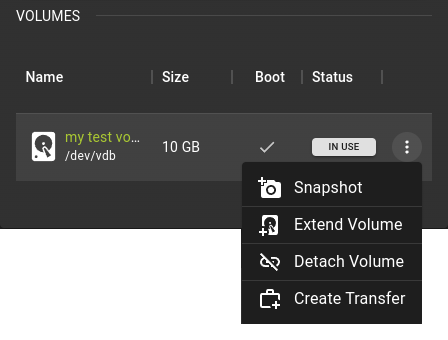
- Click on a volume and select
Detach Volume - Confirm the operation
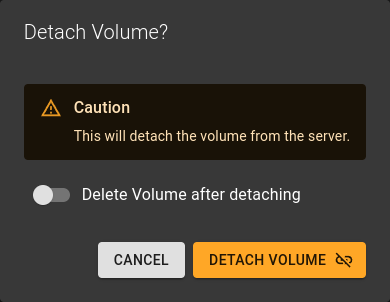
- Select if you also want to delete the volume after detaching
- Confirm the operation by clicking Detach Volume
Adding an existing Volume
Usageopenstack server attach volume <volume> <server>
Detach a volume
Usageopenstack server detach volume <volume> <server>
# Terraform Provider configuration

terraform {
  required_providers {
    openstack = {
      source  = "terraform-provider-openstack/openstack"
    }
  }
}

# Select latest OpenStack Ubuntu 24.04 Image

data "openstack_images_image_v2" "image" {
  most_recent = true

  visibility = "public"
  properties = {
    os_distro  = "ubuntu"
    os_version = "24.04"
  }
}

# Upload SSH key

resource "openstack_compute_keypair_v2" "ssh_key" {
  name       = "ssh-public-key"
  public_key = file("~/.ssh/id_rsa.pub")
}

# Network configuration

data "openstack_networking_network_v2" "ext_net" {
  name = "ext-net"
}

resource "openstack_networking_network_v2" "network" {
  name           = "net"
  admin_state_up = "true"
}

resource "openstack_networking_subnet_v2" "network" {
  name            = "subnet"
  network_id      = openstack_networking_network_v2.network.id
  cidr            = "10.20.30.0/24"
  ip_version      = 4
  enable_dhcp     = "true"
  dns_nameservers = ["1.1.1.1", "8.8.8.8"]
}

resource "openstack_networking_port_v2" "os_server_port" {
  name               = "os_server_port"
  admin_state_up     = "true"
  network_id         = openstack_networking_network_v2.network.id
  security_group_ids = [openstack_networking_secgroup_v2.ssh_access_secgroup.id,
  ]

  fixed_ip {
    subnet_id = openstack_networking_subnet_v2.network.id
  }
}

resource "openstack_networking_router_v2" "network" {
  name                = "router"
  admin_state_up      = "true"
  external_network_id = data.openstack_networking_network_v2.ext_net.id
}

resource "openstack_networking_router_interface_v2" "network" {
  depends_on = [openstack_networking_secgroup_v2.ssh_access_secgroup]
  router_id  = openstack_networking_router_v2.network.id
  subnet_id  = openstack_networking_subnet_v2.network.id
}

# Security Group for SSH access

resource "openstack_networking_secgroup_v2" "ssh_access_secgroup" {
  name        = "ssh_access_secgroup"
  description = "Security group for ssh access"
}

resource "openstack_networking_secgroup_rule_v2" "ssh_rule" {
  direction         = "ingress"
  ethertype         = "IPv4"
  protocol          = "tcp"
  port_range_min    = 22
  port_range_max    = 22
  remote_ip_prefix  = "0.0.0.0/0"
  security_group_id = openstack_networking_secgroup_v2.ssh_access_secgroup.id
}

# Create and attach network volume

resource "openstack_blockstorage_volume_v3" "volume" {
  name  = "volume"
  size  = "5"
}

resource "openstack_compute_volume_attach_v2" "attach_volume" {
  instance_id = openstack_compute_instance_v2.os_server.id
  volume_id   = openstack_blockstorage_volume_v3.volume.id
}

# Create an OpenStack VM
resource "openstack_compute_instance_v2" "os_server" {
  name        = "server"
  image_name  = data.openstack_images_image_v2.image.name
  flavor_name = "m1.small"
  key_pair    = openstack_compute_keypair_v2.ssh_key.name

  network {
    uuid = openstack_networking_network_v2.network.id
    port = openstack_networking_port_v2.os_server_port.id
  }

  lifecycle {
    create_before_destroy = true
    ignore_changes        = [flavor_name, image_name]
  }
}

# Create a floating IP / public IP
resource "openstack_networking_floatingip_v2" "floatip_1" {
  pool = "ext-net"
}

# Associate the floating IP
resource "openstack_networking_floatingip_associate_v2" "floatip_1" {
  floating_ip = openstack_networking_floatingip_v2.floatip_1.address
  port_id = openstack_networking_port_v2.os_server_port.id
}
Connecting / Disconnecting Networks
Add server to a network
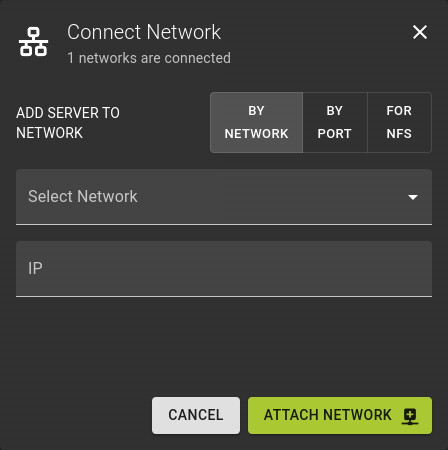
In the Network card on the servers detail page:
- Click the button at the top right of the network card
- Select how you want to connect
By Network- Select the Network
- Optionally provide an IP address on the selected network
By Port- Select an available port from the list
For NFS- Select the NFS share you want to connect to.
- Click Attach Network
Remove server from network
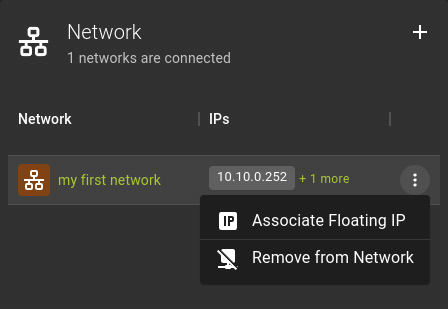
In the Network card on the servers detail page:
- Click the option on a network and select
Remove from Networkfrom the menu
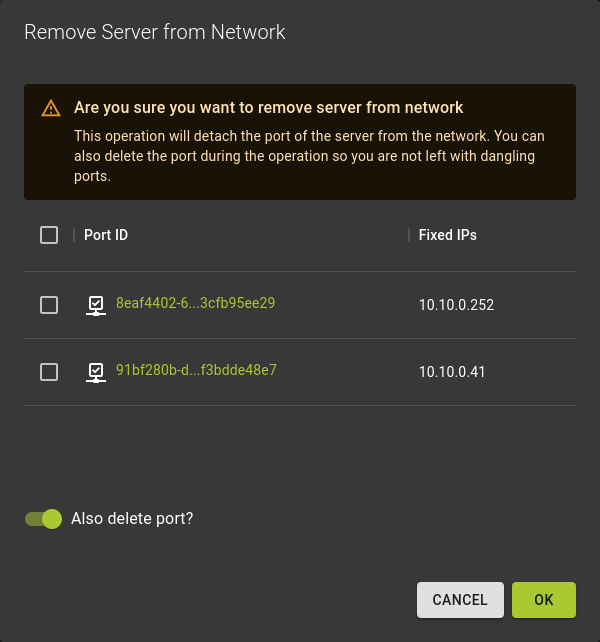
In the emerging dialog:
- Select which ports to detach on the selected network (in case there are more than one)
- Chose whether you want to detach only or also clean up the detached port by selecting
Also delete port
Add server to a network
Usageopenstack server add network <server> <network>
<server>- Identifier of server
<network>- Identifier of network
Remove server from network
Usageopenstack server remove network <server> <network>
<server>- Identifier of server
<network>- Identifier of network
Example
# Terraform Provider configuration

terraform {
  required_providers {
    openstack = {
      source  = "terraform-provider-openstack/openstack"
    }
  }
}

# Network configuration

data "openstack_networking_network_v2" "ext_net" {
  name = "ext-net"
}

resource "openstack_networking_network_v2" "network" {
  name           = "net"
  admin_state_up = "true"
}

resource "openstack_networking_subnet_v2" "network" {
  name            = "subnet"
  network_id      = openstack_networking_network_v2.network.id
  cidr            = "10.20.30.0/24"
  ip_version      = 4
  enable_dhcp     = "true"
  dns_nameservers = ["1.1.1.1", "8.8.8.8"]
}

resource "openstack_networking_router_v2" "network" {
  name                = "router"
  admin_state_up      = "true"
  external_network_id = data.openstack_networking_network_v2.ext_net.id
}

resource "openstack_networking_router_interface_v2" "network" {
  router_id  = openstack_networking_router_v2.network.id
  subnet_id  = openstack_networking_subnet_v2.network.id
}
Adding / Removing Floating IPs
-
On Server List
Click the on the server you want to manage floating IPs for and select
Manage Floating IPsfrom the menu. -
On Servers Detail Page
In the networks card click on the icon next to a network entry and select
Manage Floating IPsfrom the menu.
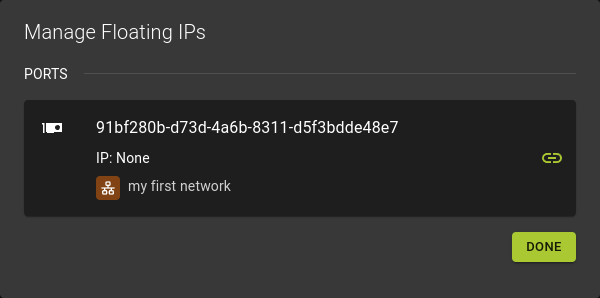 The dialog lists the ports of your server and their currently assigned IPs if there are any.
To assign a floating IP
-
Click on the Port to:
- either select an available IP you have previously reserved
- or reserve a new IP and assign it in a single interaction
-
Close the dialog when you are DONE
To remove a floating IP
- Click to remove
- Close the dialog when you are done
Add Floating IP Address
Usage
openstack server add floating ip <SERVER_ID or SERVER_NAME> <FLOATING_IP_ADDRESS>
Example
openstack server add floating ip 3504a48e-f780-4aa1-a289-29e147e14c93 109.68.225.193
Output
openstack server list

+--------------------------------------+---------------------------+--------+-----------------------------------------------------------+--------------------------+----------+
| ID                                   | Name                      | Status | Networks                                                  | Image                    | Flavor   |
+--------------------------------------+---------------------------+--------+-----------------------------------------------------------+--------------------------+----------+
| 3504a48e-f780-4aa1-a289-29e147e14c93 | simpleServer              | ACTIVE | delme=10.0.0.229, 109.68.225.193                          | Ubuntu Jammy 22.04       | m2c.tiny |
+--------------------------------------+---------------------------+--------+-----------------------------------------------------------+--------------------------+----------+
Removing Floating IP Address
Usage
openstack server remove floating ip <SERVER_ID or SERVER_NAME> <FLOATING_IP_ADDRESS>
Example
openstack server remove floating ip 3504a48e-f780-4aa1-a289-29e147e14c93 109.68.225.193
Output
openstack server list

+--------------------------------------+---------------------------+--------+-----------------------------------------------------------+--------------------------+----------+
| ID                                   | Name                      | Status | Networks                                                  | Image                    | Flavor   |
+--------------------------------------+---------------------------+--------+-----------------------------------------------------------+--------------------------+----------+
| 3504a48e-f780-4aa1-a289-29e147e14c93 | simpleServer              | ACTIVE | delme=10.0.0.229                                          | Ubuntu Jammy 22.04       | m2c.tiny |
+--------------------------------------+---------------------------+--------+-----------------------------------------------------------+--------------------------+----------+
Example
Managing Security Groups
Managing security groups for servers in OpenStack involves creating and configuring sets of rules to control inbound and outbound network traffic. These security groups act as virtual firewalls, allowing users to define access permissions for different types of traffic based on specific protocols, ports, and IP ranges.
Add to a security group
To add a security group simply click the icon and select the security groups to include.Remove from a security group
To remove a security group:- Simply click the icon and deselect the security groups to remove.
- Click the icon of an assigned security group

Add server to a security group
This operation will add all network connections of the server to a security group
Usage
openstack server add security group <server> <group>
<server>- Identifier of server
<group>- Identifier of security group
Remove server from a security group
This operation will remove all network connections of the server to a security group.Usage
openstack server remove security group <server> <group>
<server>- Identifier of server
<group>- Identifier of security group
Manage Security Groups per port
You can also add or remove security groups on a per port basis as opposed to all network connections of a server. These operations are performed on the ports of the server
openstack port --security-group <security-group> <port>
--security-group <security-group>- Security group to associate with this port (name or ID) (repeat option to set multiple security groups)
- `
- Identifier of port to update
Example
# Terraform Provider configuration

terraform {
  required_providers {
    openstack = {
      source  = "terraform-provider-openstack/openstack"
    }
  }
}

# Security group for HTTP/HTTPS access

resource "openstack_networking_secgroup_v2" "http_access_secgroup" {
  name        = "http_access_secgroup"
  description = "Security group for HTTP/HTTPS access"
}

resource "openstack_networking_secgroup_rule_v2" "http_rule" {
  direction         = "ingress"
  ethertype         = "IPv4"
  protocol          = "tcp"
  port_range_min    = 80
  port_range_max    = 80
  remote_ip_prefix  = "0.0.0.0/0"
  security_group_id = openstack_networking_secgroup_v2.http_access_secgroup.id
}

resource "openstack_networking_secgroup_rule_v2" "https_rule" {
  direction         = "ingress"
  ethertype         = "IPv4"
  protocol          = "tcp"
  port_range_min    = 443
  port_range_max    = 443
  remote_ip_prefix  = "0.0.0.0/0"
  security_group_id = openstack_networking_secgroup_v2.http_access_secgroup.id
}
Server Actions
Servers also support a variety of actions. Find the server actions by clicking the menu in the Server List
Rebuild
You can run a rebuild operation to change certain aspects of the server, most notably using a different image.
Info
Note that the image does not have to change and for volume-backed servers the image cannot change.
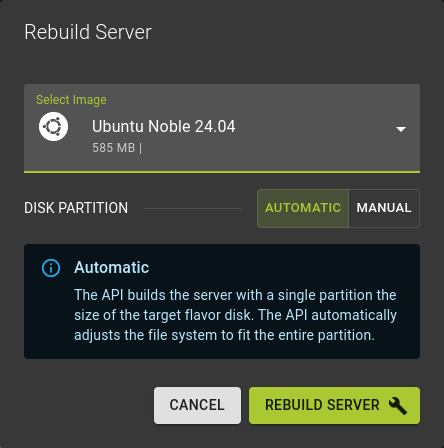 Access the rebuild option
- From the server list using the menu and pick the
Rebuild Serveroption - From the options menu on the servers detail page
Usage
openstack server rebuild <InstanceId> <ImageId>
<InstanceId>- Identifier (or name) of server you want to rebuild
<ImageId>- Identifier (or name) of image to be used to rebuild
Lock / Unlock
You can lock and unlock servers for manual changes. Use this to protect servers from accidental or unwanted deletion and modification.
To lock and unlock a server
On the server list
Click and select lock / unlock
On the detail page
Select lock / unlock from the lifecycle button on the top right
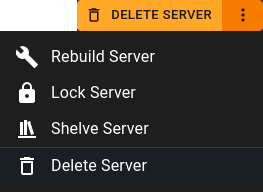
To lock a server
openstack server lock <InstanceId>
To unlock a server
openstack server unlock <InstanceId>
<InstanceId>- Identifier of server to lock or unlock. Also accepts a list of identifiers to perform a bulk operation
Shelve / Unshelve
Shelving helps when you have an idle instance you want to keep in your server list. For example, you can stop an instance at the end of a work week and resume the following week. The system keeps all associated data and resources but clears memory contents. If a shelved instance is no longer needed, it can also be entirely removed.
On server list
Click on and selectShelve Server / Unshelve Server from the menu
On server details page
SelectShelve Server / Unshelve Server from the lifecycle button on the top right
Usage
openstack server [shelve | unshelve] <server>
shelve- Use to shelve server
unshelve- Use to unshelve server
<server>- Identifier of server you are shelving / unshelving
- Can also take list of identifiers for bulk operation
Power state actions
You can change the power state of a server. For example, you can reboot or stop servers.
To show the Power state dialog
On the server list
Click and select Start, Stop, Suspend ...
On the detail page
Select the new state from the Powerstate Button on top right
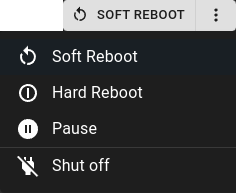
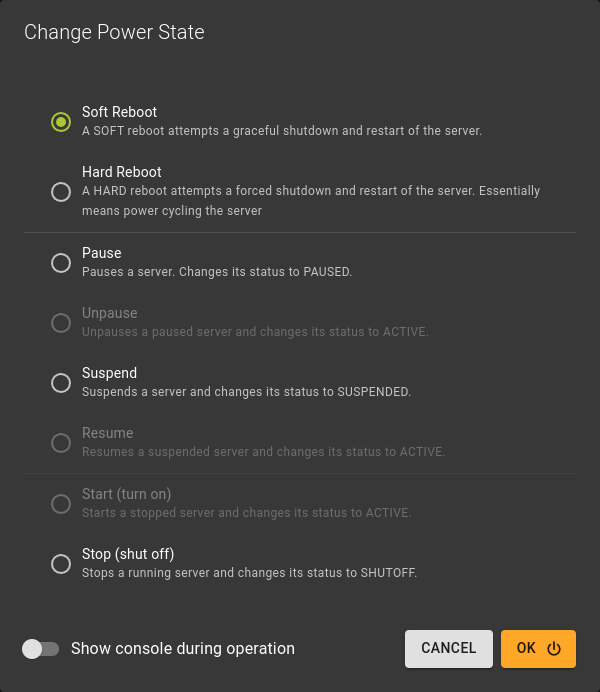
Review / Select the desired target state:
Soft Reboot- Sends an ACPI signal to the virtual machine allowing for a graceful reboot handled by the operating system
Hard Reboot- Reboots the server without involving the operating system of the server. This is equivalent to a full power cycle
Pause / Unpause- This command stores the state of the VM in RAM. A paused instance continues to run in a frozen state.
Suspend / Resume- This will send an ACPI signal to the server to suspend or resume its operation.
Start / Stop- This will turn on or turn off your server.
Change Flavor (Resize)
You can change the size of an instance by changing its flavor. This rebuilds the instance and results in a restart.
1. Click Change Flavor in the basics card
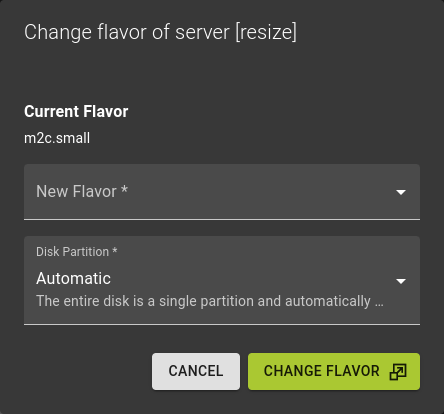
- Select new flavor
- Decide the disk partitioning strategy
- Confirm the operation by clicking CHANGE FLAVOR
Resizing a server from the CLI is a two step process.
- Trigger a resize
- Confirm or revert the resize operation
1. Trigger a resize
openstack server resize --flavor <flavor> <server>
<flavor>- Identifier of the new flavor
<server>- Identifier of the server you are resizing
2. Confirm / Revert the resize operation
Check if the resize operation has completed
openstack server show <server>
<server>- Identifier of the server you are checking
Once the servers status transitions from RESIZE to VERIFY_RESIZE confirm or revert the operation
openstack server resize [--confirm | --revert] <server>
--confirm- Confirms and finalizes the operation
--revert- Reverts the resize operation
Snapshot
Creates a snapshot of the server freezing the current state of the server. The system saves RAM and storage state for later restoration.
Info
OpenStack saves this snapshot as an Image. Do not confuse it with volume snapshots.
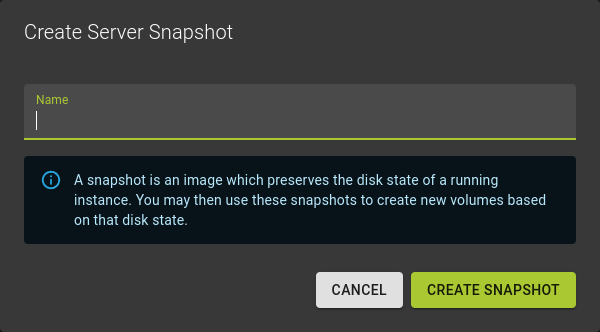 You can trigger a server snapshot from the servers detail page using server snapshot button from the titlebar
In the dialog that follows:
- Name your snapshot.
- Conclude the operation by clicking Create Snapshot
Usage
openstack server image create
    [--name <image-name>]
    [--property <key=value>]
    [--wait]
    <server>
--name <image-name>
Name of new disk image (default: server name)
--property <key=value>
Set a new property to meta_data.json on the metadata server (repeat option to set multiple values)
--wait
Wait for operation to complete
<server>
Server to create image from (name or ID)
Remote Console
The remote console provides VNC access to your server. It also provides access to window managers and graphical user interfaces like remote desktop.
The Console can be accessed
- From the
CONSOLEtab on the detail page of a server - From the server list using the and selecting
Consolefrom the menu
Usage
openstack console url show
    [--novnc | --xvpvnc | --spice]
    [--rdp | --serial | --mks]
    <server>
--novnc- Show noVNC console URL (default)
--xvpvnc- Show xvpvnc console URL
--spice- Show SPICE console URL
--rdp- Show RDP console URL
--serial- Show serial console URL
--mks- Show WebMKS console URL
<server>- Server to show URL (name or ID)
Logging
Server log
This is the log output of your server as acquired from StdOut
Event log
This is the log of events that were acting on your server.
Error log
...
Delete Server
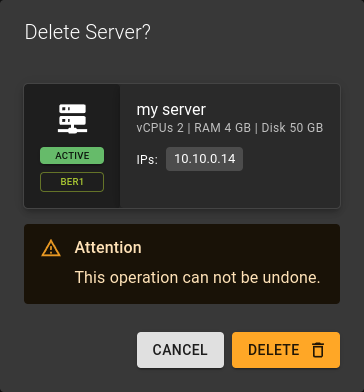 You can delete a server
- from the list view by using the option and selecting
delete. - from the details view of a server using the Delete button on the title bar.
In the emerging dialog:
Confirm the operation by clicking Delete
Usage
openstack server delete [--wait] <InstanceId>
<InstanceId>- Identifier of server you want to delete. Also accepts a list of identifiers to perform a bulk delete. (Use with caution)
[--wait]- optional
- Performs delete and waits for the operation to succeed.
Cleaning up
Deleting a server leaves behind some associated resources:
- Volumes attached to the server delete only if flagged for "Delete with server". Otherwise delete them individually.
- Networks the server was connected to may retain the port the server used. Delete those individually if needed.
- Snapshots originating from the server will remain. Delete them individually if desired.
States
Power states (ACPI)
running
paused
no state
shutdown
crashed
shutdown