SysEleven OpenStack Cloud - Networks
Concepts
OpenStack networking allows the creation and management of virtual networks within a cloud environment, allowing for secure and scalable connectivity between virtual machines and services.
You can create, update and delete networks within your project.
ext-net is a special external network provided by SysEleven. It is read-only and managed by the cloud provider. This network allows cloud resources, such as virtual machines and services, to communicate with the internet through external (public) IP addresses.
List Networks
 To get a list of all networks in a region you can click on the Networks icon in the sidebar.
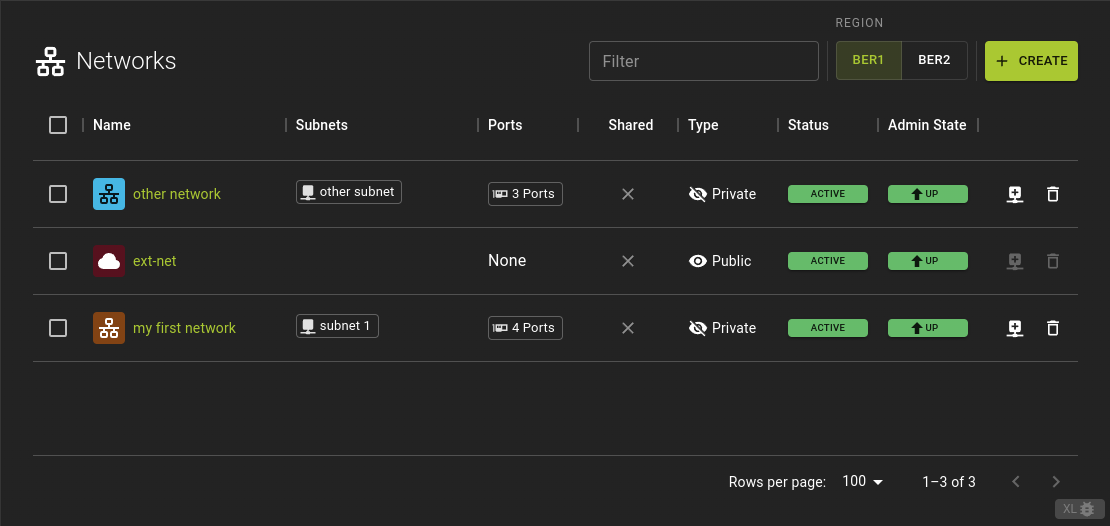 From the list you can:
- Click on the network’s ID or name to view detailed information.
- Get an overview of the associated subnets and ports by hovering over the corresponding table cell.
- Create a subnet using the icon
- Delete a network
Usage
openstack network list
Output
+--------------------------------------+--------------------+--------------------------------------+
| ID                                   | Name               | Subnets                              |
+--------------------------------------+--------------------+--------------------------------------+
| 3d9d1e47-1d2f-4f9b-bcfc-d3f1a8b4b575 | PrivateNetwork     | 8a3cbb63-bf1e-4d45-a12b-5c99d8e87e3c |
| 22d4cf14-9e10-4db7-8f5b-4bbf1c3d4d56 | PublicNetwork      | 4d5e7b5a-df2c-4d67-b456-1f8a9c2e1c98 |
| 66b6d28e-5c47-4e8e-8b27-90b7d04e7b88 | ext-net            |                                      |
+--------------------------------------+--------------------+--------------------------------------+
Example
Create A Network
Network creation can be done either with or without specifying subnet details. Including subnet specifications lets you define parameters like IP address range, Gateway, DHCP, and DNS. Alternatively, you can create a network first and add subnets later.

- Name and describe your network.
- Configure Subnet (Optional):
- Assign a name to the subnet.
Network Address: The address range for the subnet.IP version: Choose IPv4 or IPv6.Gateway: The IP address for routing traffic.DHCP: Enable or disable automatic IP address assignment.Allocation Pool: Define the range of IP addresses available for allocation.DNS: IP addresses of servers for resolving domain names.Host Routes: Additional routes for traffic within the subnet.
- Confirm by clicking Create Network
Usage
openstack network create
    [--share | --no-share]
    [--enable | --disable]
    [--description <description>]
    [--mtu <mtu>]
    [--availability-zone-hint <availability-zone>]
    [--enable-port-security | --disable-port-security]
    [--external | --internal]
    [--default | --no-default]
    [--qos-policy <qos-policy>]
    [--transparent-vlan | --no-transparent-vlan]
    [--dns-domain <dns-domain>]
    --subnet <subnet>
    <name>
--share- Share the network between projects
--no-share- Do not share the network between projects
--enable- Enable network (default)
--disable- Disable network
--description <description>- Set network description
--mtu <mtu>- Set network mtu
--availability-zone-hint <availability-zone>- Availability Zone in which to create this network (Network Availability Zone extension required, repeat option to set multiple availability zones)
--enable-port-security- Enable port security by default for ports created on this network (default)
--disable-port-security- Disable port security by default for ports created on this network
--external- The network has an external routing facility that’s not managed by Neutron and can be used as in: openstack router set –external-gateway NETWORK (external-net extension required)
--internal- Opposite of ‘–external’ (default)
--default- Specify if this network should be used as the default external network
--no-default- Do not use the network as the default external network (default)
--qos-policy <qos-policy>- QoS policy to attach to this network (name or ID)
--transparent-vlan- Make the network VLAN transparent
--no-transparent-vlan- Do not make the network VLAN transparent
--dns-domain <dns-domain>- Set DNS domain for this network (requires DNS integration extension)
--tag <tag>- Tag to be added to the network (repeat option to set multiple tags)
--no-tag- No tags associated with the network
--subnet <subnet>- IPv4 subnet for fixed IPs (in CIDR notation)
<name>- New network name
Example
# Terraform Provider configuration

terraform {
  required_providers {
    openstack = {
      source  = "terraform-provider-openstack/openstack"
    }
  }
}

# Network configuration

data "openstack_networking_network_v2" "ext_net" {
  name = "ext-net"
}

resource "openstack_networking_network_v2" "network" {
  name           = "net"
  admin_state_up = "true"
}

resource "openstack_networking_subnet_v2" "network" {
  name            = "subnet"
  network_id      = openstack_networking_network_v2.network.id
  cidr            = "10.20.30.0/24"
  ip_version      = 4
  enable_dhcp     = "true"
  dns_nameservers = ["1.1.1.1", "8.8.8.8"]
}

resource "openstack_networking_router_v2" "network" {
  name                = "router"
  admin_state_up      = "true"
  external_network_id = data.openstack_networking_network_v2.ext_net.id
}

resource "openstack_networking_router_interface_v2" "network" {
  router_id  = openstack_networking_router_v2.network.id
  subnet_id  = openstack_networking_subnet_v2.network.id
}
Inspect and modify Network
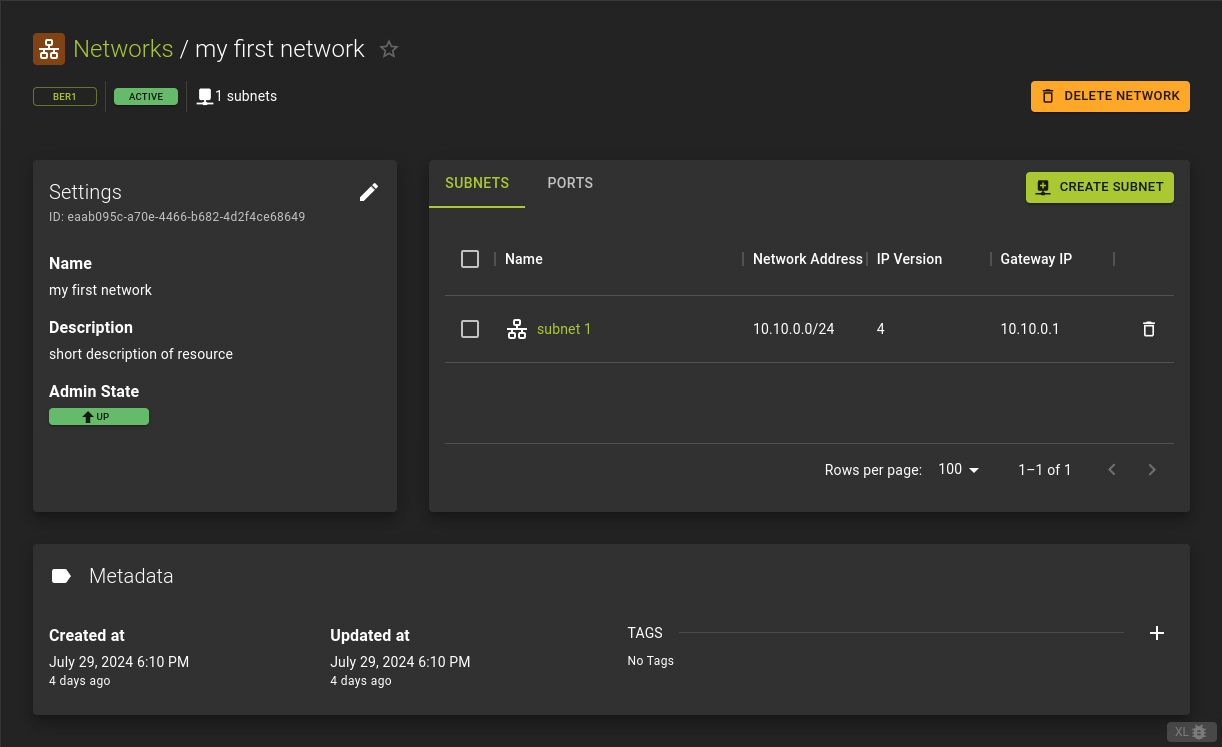 You can view a network's detail page by clicking its name in the network list.
On the detail page, you'll find the basic settings as well as the attached subnets and ports. From here, you can create new subnets and ports.
Example
Basic Changes
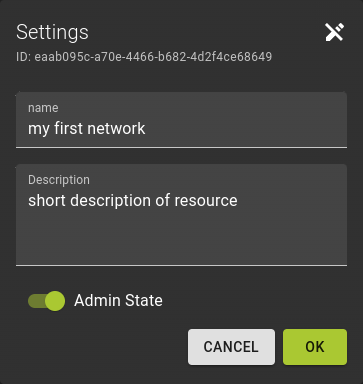 Click on the icon on the basics card to enter edit mode.
Edit immediate properties of the network, such as
NameDescriptionAdmin state
Save the changes by clicking OK
Usage
openstack network set
    [--name <name>]
    [--enable | --disable]
    [--share | --no-share]
    [--description <description>]
    [--mtu <mtu>]
    [--enable-port-security | --disable-port-security]
    [--external | --internal]
    [--default | --no-default]
    [--qos-policy <qos-policy> | --no-qos-policy]
    [--tag <tag>]
    [--no-tag]
    [--dns-domain <dns-domain>]
    <network>
--name <name>- Set network name
--enable- Enable network
--disable- Disable network
--share- Share the network between projects
--no-share- Do not share the network between projects
--description <description>- Set network description
--mtu <mtu>- Set network mtu
--enable-port-security- Enable port security by default for ports created on this network
--disable-port-security- Disable port security by default for ports created on this network
--external- The network has an external routing facility that’s not managed by Neutron and can be used as in: openstack router set –external-gateway NETWORK (external-net extension required)
--internal- Opposite of ‘–external’
--default- Set the network as the default external network
--no-default- Do not use the network as the default external network
--qos-policy <qos-policy>- QoS policy to attach to this network (name or ID)
--no-qos-policy- Remove the QoS policy attached to this network
--tag <tag>- Tag to be added to the network (repeat option to set multiple tags)
--no-tag- Clear tags associated with the network. Specify both –tag and –no-tag to overwrite current tags
--dns-domain <dns-domain>- Set DNS domain for this network (requires DNS integration extension)
<network>- Network to modify (name or ID)
Example
Manage Subnets
A subnet is a range of IP addresses with specific settings that helps organize and manage network traffic. When you create new ports on a network, subnets provide the IP addresses needed for those connections.
List Subnets
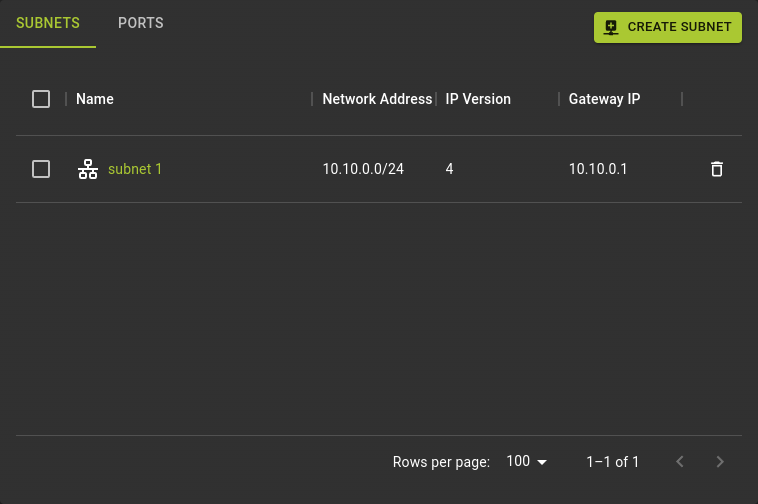 From the subnets list view, you can:
- Access detailed information about each subnet by clicking on its ID or name.
- View key parameters of each subnet directly from the list, such as network address, IP version, and gateway.
Create Subnet
Creating a subnet involves specifying various network parameters to configure how IP addresses are allocated and managed.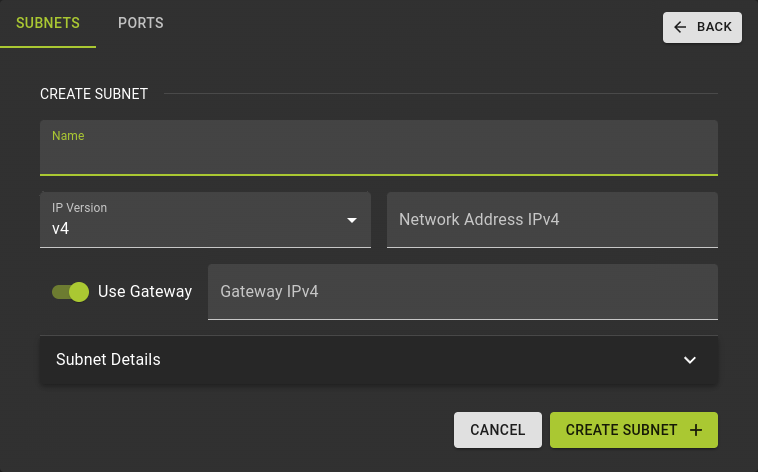 Name:
Name:
- Provide a meaningful name for the subnet.
Configure Subnet Details:
- Network Address: Enter the IP address range for the subnet in CIDR notation (e.g., 192.168.1.0/24).
- IP Version: Choose between IPv4 or IPv6, depending on your network requirements.
- Gateway: Specify the gateway IP address used for routing traffic within the subnet.
- DHCP: Enable or disable Dynamic Host Configuration Protocol for automatic IP assignment.
- Allocation Pool: Define a range of IP addresses to be allocated dynamically.
- DNS Name Servers: Enter the IP addresses of DNS servers for name resolution.
- Host Routes: Add any specific routing information for directing traffic to different networks.
- Click the Create subnet button to finalize the creation of your subnet with the specified configurations.
Modify Subnet
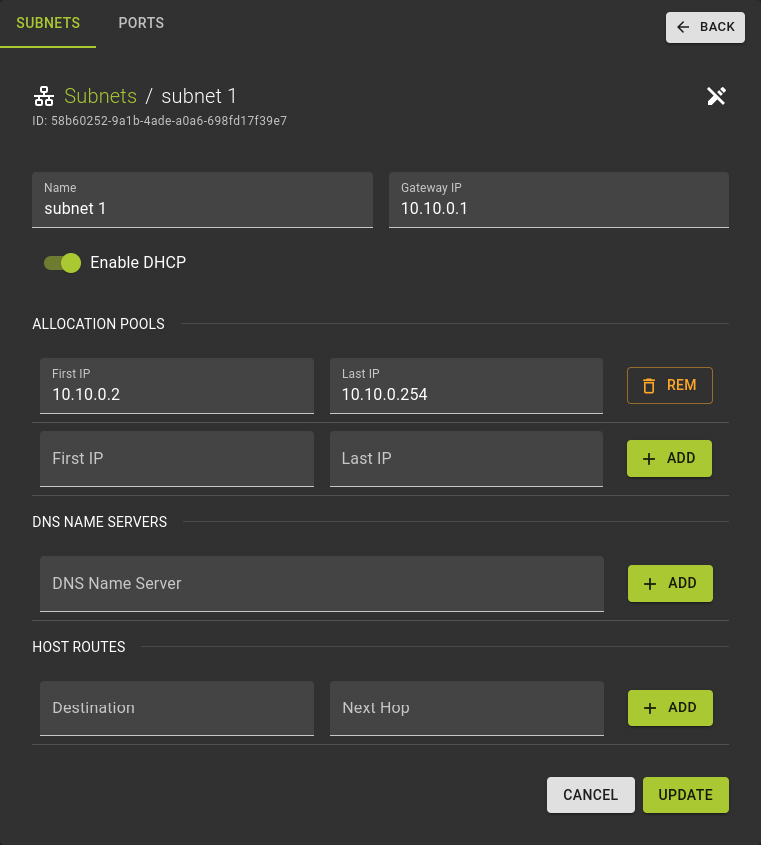
To update a subnet:
- Navigate to its details view
- Click the edit button.
This allows you to adjust settings such as the name, gateway, and other parameters to meet changing network requirements.
Delete Subnet
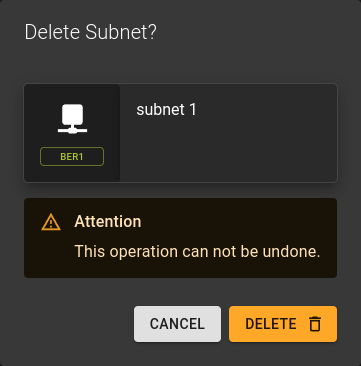 To delete a subnet
- Click the button in the subnet list.
- Confirm the deletion in the emerging dialog by clicking Delete .
List
openstack subnet list --network <network>
Output
+--------------------------------------+----------------+----------------+----------------------+
| ID                                   | Name           | Network        | Subnet               |
+--------------------------------------+----------------+----------------+----------------------+
| 1a2b3c4d-5678-90ab-cdef-1234567890ab | subnet-one     | 5d6f7a8b-1234 | 192.168.1.0/24       |
| 2b3c4d5e-6789-01bc-defg-2345678901bc | subnet-two     | 5d6f7a8b-1234 | 192.168.2.0/24       |
| 3c4d5e6f-7890-12cd-efgh-3456789012cd | subnet-three   | 5d6f7a8b-1234 | 192.168.3.0/24       |
+--------------------------------------+----------------+----------------+----------------------+
Create
openstack subnet create
    [--network <network-id>]
    [--subnet-range <network-address>/<prefix-length>]
    [--ip-version <ip-version>]
    [--gateway <gateway-ip>]
    [--dhcp | --no-dhcp]
    [--allocation-pool start=<start-ip>,end=<end-ip>]
    [--dns-nameserver <dns-server-ip>]
    [--host-route destination=<destination-network>,nexthop=<next-hop-ip>]
    <name>
--network- The ID of the network to which the subnet belongs.
--subnet-range- The IP address range for the subnet.
--ip-version- The IP version (e.g., 4 for IPv4).
--gateway- The IP address for the gateway.
--dhcp | --no-dhcp- Enable (default) or disable.
--allocation-pool- Defines the IP address range for allocation.
--dns-nameserver- Specifies DNS server IP addresses.
--host-route- Adds a host route with the destination network and next-hop IP.
<name>- The name of the subnet.
Modify
openstack subnet set
    [--name <name>]
    [--network <network-id>]
    [--subnet-range <network-address>/<prefix-length>]
    [--ip-version <ip-version>]
    [--gateway <gateway-ip>]
    [--dhcp | --no-dhcp]
    [--allocation-pool start=<start-ip>,end=<end-ip>]
    [--dns-nameserver <dns-server-ip>]
    [--host-route destination=<destination-network>,nexthop=<next-hop-ip>]
    <subnet>
--name- Update the name of the subnet.
--network- Associate the subnet with a specific network (if needed).
--subnet-range- Modify the subnet range.
--ip-version- Change the IP version (IPv4 or IPv6).
--gateway- Set or update the gateway IP address.
--dhcp | --no-dhcp- Enable or disable.
--allocation-pool- Define or update the IP allocation pool.
--dns-nameserver- Specify or update DNS nameservers.
--host-route- Set or update host routes.
<subnet>- The ID of the subnet you want to update.
Delete
openstack subnet delete <subnet>
<subnet>- Identifier of subnet to delete
- Accepts list of identifiers for bulk deletion
Example
# Terraform Provider configuration

terraform {
  required_providers {
    openstack = {
      source  = "terraform-provider-openstack/openstack"
    }
  }
}

# Network configuration

data "openstack_networking_network_v2" "ext_net" {
  name = "ext-net"
}

resource "openstack_networking_network_v2" "network" {
  name           = "net"
  admin_state_up = "true"
}

resource "openstack_networking_subnet_v2" "network" {
  name            = "subnet"
  network_id      = openstack_networking_network_v2.network.id
  cidr            = "10.20.30.0/24"
  ip_version      = 4
  enable_dhcp     = "true"
  dns_nameservers = ["1.1.1.1", "8.8.8.8"]
}

resource "openstack_networking_router_v2" "network" {
  name                = "router"
  admin_state_up      = "true"
  external_network_id = data.openstack_networking_network_v2.ext_net.id
}

resource "openstack_networking_router_interface_v2" "network" {
  router_id  = openstack_networking_router_v2.network.id
  subnet_id  = openstack_networking_subnet_v2.network.id
}
Manage Ports
A port is a connection point for attaching a single device, such as the NIC of a server, to a network. The port also describes the associated network configuration, such as the MAC and IP addresses to be used on that port.
List Ports
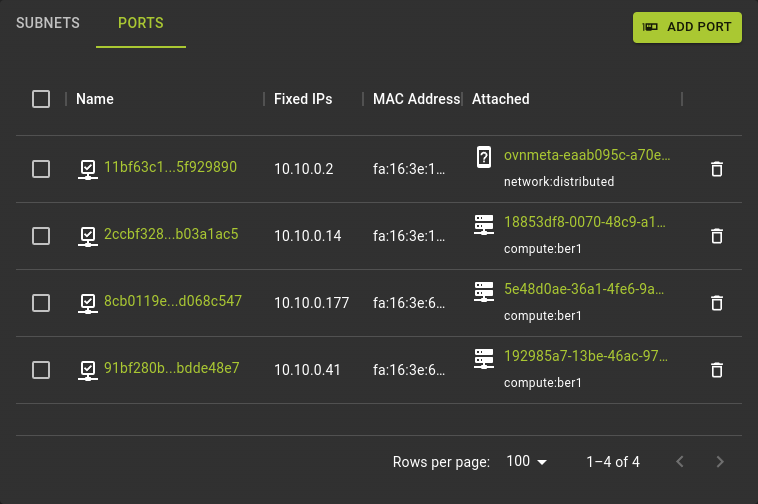 The port list provides an overview of all the ports within a network. From this list, you can:
- Click on the name or ID of a port to access the detailed view.
- Access the attached device to see the instance or other network resource connected to the port.
Add Port
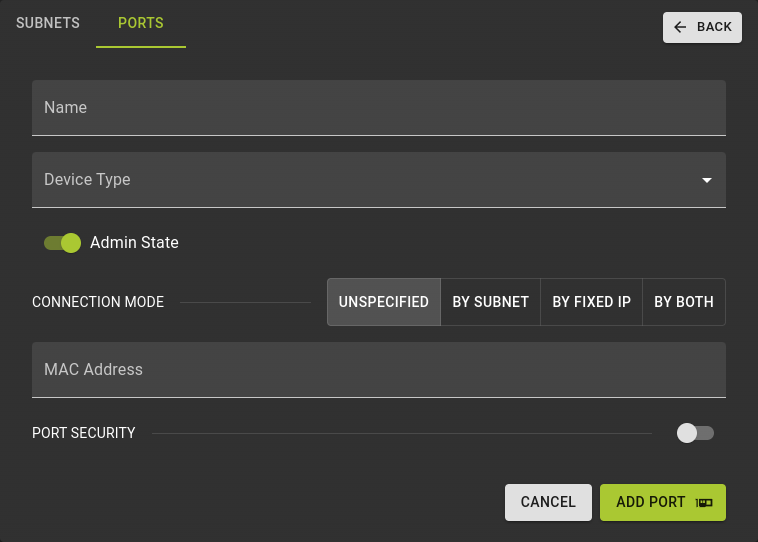 You can create a port by clicking the Add Port option on the list of ports.
To create a port:
- Provide a name
- Select the type of device the port will connect to.
- Determine how the port will connect to the network. Options include:
- By Subnet: Specify the subnet for the port.
- By Fixed IP: Provide a fixed IP address for the port.
- By Both: Use both subnet and fixed IP for the connection.
- Provide a MAC address for the port. If left blank, one will be generated automatically.
- Assign a security group to the port to manage its network traffic rules.
- Define allowed address pairs.
Modify Port
 To update a port:
- Navigate to the ports details view
- Click the edit button.
This allows you to modify settings such as the port's name, MAC address, IP configuration, security groups, and other parameters.
Delete Port
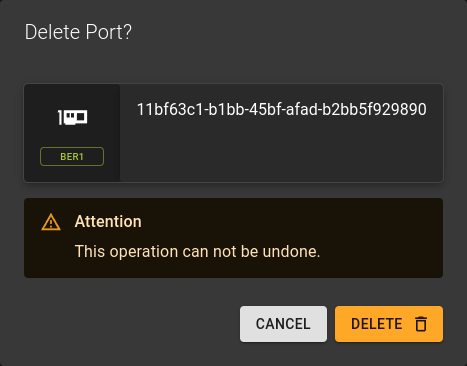 To delete a port:
- Click the button in the port list.
- Click the button in the port list.
- In the emerging prompt confirm the deletion by clicking Delete
Usage
openstack port list --network <network>
<network>- Identifier of network
Output
+--------------------------------------+-----------------+--------+--------------------+----------------------------+
| ID                                   | Name            | Status | MAC Address        | Fixed IP Addresses         |
+--------------------------------------+-----------------+--------+--------------------+----------------------------+
| 12345678-9abc-def0-1234-56789abcdef0 | port1           | ACTIVE | fa:16:3e:1a:2b:3c  | 192.168.1.10               |
| 23456789-0bcd-ef12-3456-7890abcdef1  | port2           | DOWN   | fa:16:3e:4d:5e:6f  | 192.168.1.11               |
| 34567890-1cde-f123-4567-890abcdef2   | port3           | ACTIVE | fa:16:3e:7g:8h:9i  | 192.168.1.12, 192.168.1.13 |
+--------------------------------------+-----------------+--------+--------------------+----------------------------+
Create
openstack port create
    [--network <network-id>]
    [--device <device-id>]
    [--device-owner <device-type>]
    [--fixed-ip subnet=<subnet-id>,ip-address=<fixed-ip>]
    [--mac-address <mac-address>]
    [--security-group <security-group-id>]
    [--allowed-address ip-address=<ip-address>[,mac-address=<mac-address>]]
    <name>
--network- Specifies the network to which the port will be attached.
--device- Identifies the device (e.g., a server or router) that the port will connect to.
--device-owner- Sets the type of device using the port, such as server, DHCP, router, or load balancer.
--fixed-ip- Defines the IP address assignment for the port.
--mac-address- Provides a MAC address for the port. If not specified, a MAC address will be generated automatically.
--security-group: Assigns a security group to the port to control its network traffic.
--allowed-address- Defines allowed address pairs for the port, which can include IP addresses and optionally MAC addresses.
<name>- Assigns a name to the port.
Modify
openstack port update
    [--name <new-name>]
    [--allowed-address ip-address=<ip-address>[,mac-address=<mac-address>]]
    [--security-group <security-group-id>]
    [--no-security-group]
    <port>
--name- Updates the name of the port.
--allowed-address- Modifies the allowed address pairs for the port.
--security-group- Adds a security group to the port.
--no-security-group- Removes all security groups from the port.
<port>- Specifies the ID of the port to update.
Delete
openstack port delete <port>
<port>- Identifier of the port to delete
- Accepts list of identifiers for bulk deletion
Example
# Terraform Provider configuration

terraform {
  required_providers {
    openstack = {
      source  = "terraform-provider-openstack/openstack"
    }
  }
}

# Network configuration

data "openstack_networking_network_v2" "ext_net" {
  name = "ext-net"
}

resource "openstack_networking_network_v2" "network" {
  name           = "net"
  admin_state_up = "true"
}

resource "openstack_networking_subnet_v2" "network" {
  name            = "subnet"
  network_id      = openstack_networking_network_v2.network.id
  cidr            = "10.20.30.0/24"
  ip_version      = 4
  enable_dhcp     = "true"
  dns_nameservers = ["1.1.1.1", "8.8.8.8"]
}

resource "openstack_networking_port_v2" "os_server_port" {
  name               = "os_server_port"
  admin_state_up     = "true"
  network_id         = openstack_networking_network_v2.network.id

  fixed_ip {
    subnet_id = openstack_networking_subnet_v2.network.id
  }
}

resource "openstack_networking_router_v2" "network" {
  name                = "router"
  admin_state_up      = "true"
  external_network_id = data.openstack_networking_network_v2.ext_net.id
}

resource "openstack_networking_router_interface_v2" "network" {
  router_id  = openstack_networking_router_v2.network.id
  subnet_id  = openstack_networking_subnet_v2.network.id
}
Delete Network
Please note that in order to delete a network, all connected ports must first be deleted. If any ports are still attached to the network, you will be asked to delete them before the network can be removed.
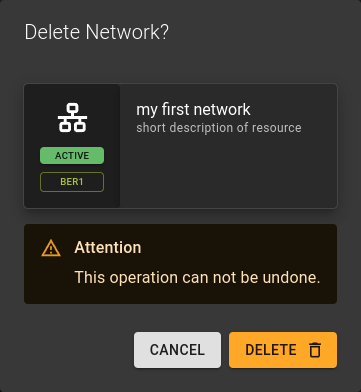 You can delete a network in two ways:
- From the list view use the button at the end of the row.
- From the details view click the Delete Network option at the top of the page.
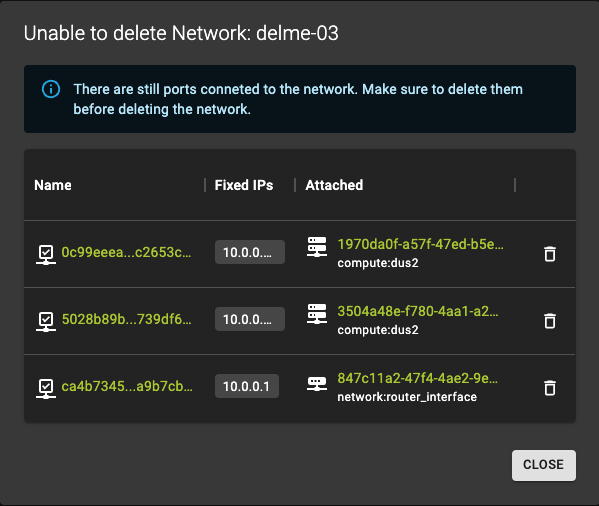 The dialogue displays a list of the ports that are still connected to the network. To check the attached devices, please click on the link. Alternatively, you can delete the port directly from the dialogue by clicking on the button.
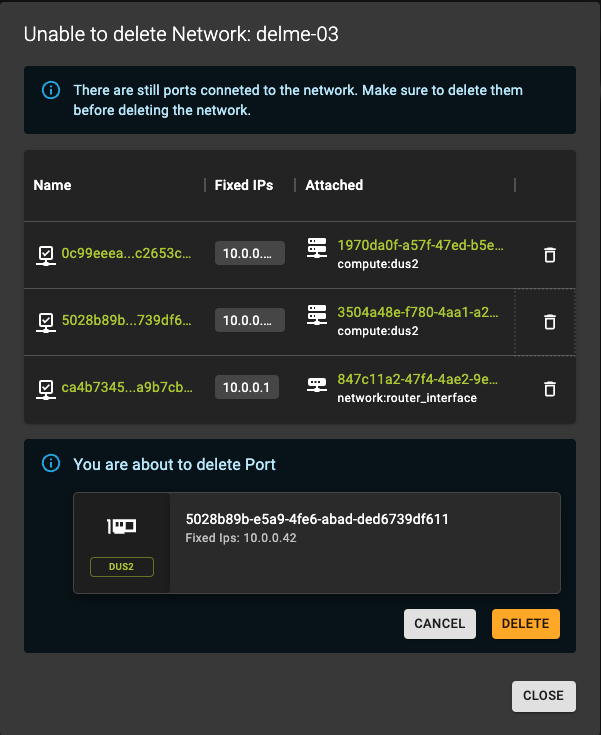 Should the port be deletable click DELETE to delete the port.
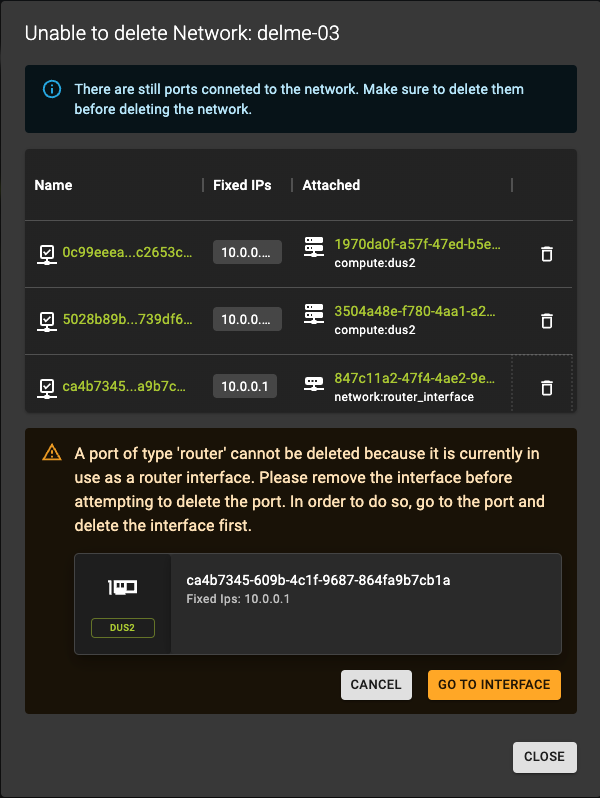 In case the port is connected to a router interface, it is necessary to first detach the interface.
To do so, simply click on the GO TO INTERFACE button, which will direct you to the routers interface. From there, you can detach the interface.
Navigate back and continue the deletion process by again clicking the button.
 Once all ports have been deleted, the network and all associated subnets can be removed.
Indicate your understanding of the potential risks by checking the box provided.
To complete the deletion process, please click the Delete Network button.
Usage
openstack network delete <network>
<network>- Identifier of network to delete
- Accepts list of identifiers for bulk deletion
Example